 En
En
 De
De Fr
Fr Ru
Ru Es
Es Pt
Pt It
It Ar
Ar Se
Se Nl
Nl Jp
Jp Tw
Tw Gr
Gr Th
Th Fi
Fi Ko
Ko Pl
Pl Cn
Cn Tr
Tr No
No Dk
Dk Il
Il My
My Hu
Hu Hi
Hi
How do you put lc connectors on fiber?

To put LC connectors on fiber, follow these steps:
1. Strip the fiber cable: Use a fiber stripping tool to carefully remove the outer jacket of the fiber cable, exposing the bare fiber.
2. Clean the fiber: Use lint-free wipes and isopropyl alcohol to clean the bare fiber, ensuring there is no dust or debris.
3. Cleave the fiber: Use a fiber cleaver to make a clean and smooth cut on the fiber end, perpendicular to the fiber axis.
4. Insert the fiber into the connector: Carefully insert the cleaved fiber into the connector ferrule until it reaches the stop inside the connector.
5. Apply epoxy or adhesive: Apply a small amount of epoxy or adhesive to secure the fiber inside the connector.
6. Cure the epoxy: If using epoxy, follow the manufacturer's instructions to cure it properly, typically by applying heat or UV light.
7. Polish the connector: Use a polishing film or pad to polish the connector end, ensuring a smooth and flat surface.
8. Inspect and test: Inspect the connector for any defects or imperfections. Use a fiber optic tester to verify the quality and integrity of the connection.
Note: It is recommended to have proper training and experience in fiber optic termination before attempting to put LC connectors on fiber.
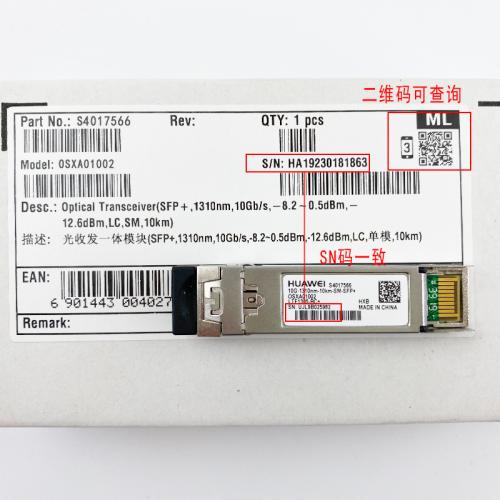
LC Connector Types and Compatibility
LC connectors are widely used in fiber optic networks due to their small size and high performance. To put LC connectors on fiber, a few steps need to be followed:
1. Prepare the fiber: Strip the fiber cable to expose the bare fiber. Clean the fiber end face with lint-free wipes and isopropyl alcohol to remove any dirt or contaminants.
2. Prepare the connector: Remove the dust cap from the LC connector and inspect it for any damage. Make sure the connector is compatible with the fiber type being used.
3. Cleaving the fiber: Use a fiber cleaver to create a clean, flat end on the fiber. The cleave should be perpendicular to the fiber axis to ensure proper alignment.
4. Insert the fiber: Gently insert the cleaved fiber into the LC connector until it reaches the end face. Take care not to touch the end face or allow it to come into contact with any surfaces.
5. Crimping or securing the connector: Depending on the type of LC connector being used, it may require crimping or securing the connector to the fiber using a special tool or adhesive.
6. Inspect and test: After the connector is attached, inspect the end face using a fiber optic microscope to ensure it is clean and free from defects. Perform a visual inspection to check for any cracks or chips. Finally, conduct a continuity test or use an optical power meter to verify the connection's performance.
LC connectors come in different types, including simplex, duplex, and quad, to accommodate various fiber optic applications. They are also available in different versions, such as LC UPC (Ultra Physical Contact) and LC APC (Angled Physical Contact), which offer different levels of performance and compatibility.
The latest point of view on LC connectors is that they continue to be a popular choice for high-speed data transmission, especially in data centers and telecommunications networks. They provide reliable and efficient connections, and their small form factor allows for high-density installations. Additionally, advancements in LC connector technology, such as improved polishing techniques and better alignment methods, have further enhanced their performance and compatibility with different fiber types.
Steps for Terminating LC Connectors on Fiber Optic Cables
Steps for Terminating LC Connectors on Fiber Optic Cables:
1. Prepare the cable: Strip the outer jacket of the fiber optic cable using a fiber optic stripping tool. Be careful not to damage the inner fibers. Once the jacket is removed, clean the fibers with a lint-free wipe and isopropyl alcohol to remove any dirt or debris.
2. Prepare the fibers: Use a fiber cleaver to cut the fibers at a 90-degree angle. This ensures a clean and precise cut. Remove any excess fiber coating using a fiber stripping tool, leaving only the bare fiber exposed.
3. Insert the fibers into the connector: Open the connector and carefully insert the fibers into the ferrule. Make sure the fiber ends are flush with the end face of the connector. Use a microscope to inspect the fiber ends for any defects or irregularities.
4. Apply epoxy: Apply a small amount of epoxy adhesive to the connector ferrule. Be careful not to use too much, as it can cause the epoxy to overflow and create a messy termination. The epoxy helps secure the fibers in place and provides a stable connection.
5. Cure the epoxy: Follow the manufacturer's instructions to cure the epoxy. This usually involves placing the connector in a curing oven or using a UV light source. Allow sufficient time for the epoxy to fully cure before handling the connector.
6. Test the connector: After the epoxy has cured, use a fiber optic power meter and light source to test the connector. This ensures that the termination is successful and that there is minimal loss or reflection in the connection.
It's important to note that there are variations in the termination process depending on the specific LC connector being used and any specific requirements set by the manufacturer. Therefore, it is always recommended to refer to the manufacturer's instructions and guidelines when terminating LC connectors on fiber optic cables.
Best Practices for Installing LC Connectors on Fiber Optic Cables
Best Practices for Installing LC Connectors on Fiber Optic Cables
Installing LC connectors on fiber optic cables requires precision and attention to detail to ensure optimal performance and reliability. Here are the best practices to follow:
1. Prepare the cable: Start by stripping the outer jacket of the fiber optic cable using a fiber stripper. Be careful not to damage the inner fibers. Next, clean the fibers using lint-free wipes and isopropyl alcohol to remove any dirt or contaminants.
2. Cleaving the fiber: Use a precision cleaver to ensure a clean and flat cut on the fiber end. This step is crucial as it affects the quality of the connection. Follow the cleaver manufacturer's instructions for the best results.
3. Applying epoxy: Apply a small amount of epoxy adhesive to the cleaved end of the fiber. Be careful not to use too much epoxy, as it can cause excess adhesive to seep into the connector.
4. Inserting the fiber: Carefully insert the fiber into the LC connector ferrule, making sure it is aligned properly. Use a microscope to verify the alignment and adjust if necessary.
5. Curing the epoxy: Place the connector in a curing oven or use a UV light source to cure the epoxy. Follow the manufacturer's instructions for the recommended curing time and temperature.
6. Polishing the connector: Once the epoxy is cured, polish the connector using a polishing puck and lapping film. This step ensures a smooth and flat end face, which is essential for optimal light transmission.
7. Inspecting and testing: After polishing, inspect the connector under a microscope to check for any defects or imperfections. Once satisfied, perform a continuity test and optical power measurement to ensure the connection is working correctly.
It is important to stay updated with the latest industry standards and guidelines for installing LC connectors. As technology advances, new techniques and tools may become available, so it is recommended to consult the latest resources and seek professional training if needed.


")
")


