 En
En
 De
De Fr
Fr Ru
Ru Es
Es Pt
Pt It
It Ar
Ar Se
Se Nl
Nl Jp
Jp Tw
Tw Gr
Gr Th
Th Fi
Fi Ko
Ko Pl
Pl Cn
Cn Tr
Tr No
No Dk
Dk Il
Il My
My Hu
Hu Hi
Hi
How to make a rj45 to rj45 cisco console cable?
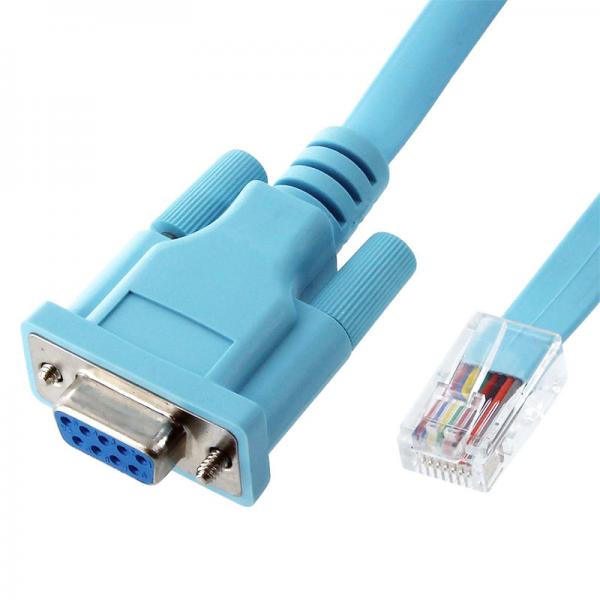
To make a RJ45 to RJ45 Cisco console cable, you will need a standard Ethernet cable and a RJ45 to DB9 serial adapter. First, cut one end of the Ethernet cable and strip the outer insulation to expose the individual wires. Next, arrange the wires according to the color code used by Cisco for console cables. The pinout is as follows:
- Pin 1 (White/Orange) to Pin 8 (CTS)
- Pin 2 (Orange) to Pin 6 (DSR)
- Pin 3 (White/Green) to Pin 2 (RXD)
- Pin 4 (Blue) to Pin 5 (GND)
- Pin 5 (White/Blue) to Pin 4 (TXD)
- Pin 6 (Green) to Pin 3 (DTR)
- Pin 7 (White/Brown) to Pin 7 (RTS)
- Pin 8 (Brown) to Pin 1 (DCD)
Once the wires are arranged, crimp them into a RJ45 connector on one end of the cable. On the other end, connect the RJ45 to DB9 serial adapter. Finally, connect the RJ45 end to the console port of the Cisco device and the DB9 end to the serial port of your computer. This cable will allow you to establish a console connection to the Cisco device.
Choosing the right cable type for your Cisco console connection
Choosing the right cable type for your Cisco console connection is essential to ensure a reliable and efficient connection between your computer and Cisco networking devices. One common type of cable used for this purpose is the RJ45 to RJ45 Cisco console cable.
To make a RJ45 to RJ45 Cisco console cable, you will need the following materials:
1. RJ45 connectors: These connectors are used to terminate the ends of the cable and connect it to your devices.
2. Ethernet cable: This cable will serve as the base for your Cisco console cable. Make sure to choose a high-quality cable to ensure a stable connection.
3. Crimping tool: This tool is necessary to attach the RJ45 connectors to the Ethernet cable.
To make the cable, follow these steps:
1. Strip the outer jacket of the Ethernet cable to expose the inner wires. Use a wire stripper or a sharp knife to carefully remove the insulation without damaging the wires.
2. Separate the inner wires and arrange them according to the T568B wiring standard. The standard color coding for the wires is as follows: orange-white, orange, green-white, blue, blue-white, green, brown-white, brown.
3. Trim the excess wires to ensure they are of equal length.
4. Insert the wires into the RJ45 connector, making sure they are in the correct order. Double-check the wiring sequence to avoid any connectivity issues.
5. Use the crimping tool to firmly secure the RJ45 connector to the Ethernet cable. Apply enough pressure to ensure a tight connection.
6. Repeat the process for the other end of the cable.
By following these steps, you can create a RJ45 to RJ45 Cisco console cable that will allow you to establish a console connection with your Cisco networking devices. It is important to note that different Cisco devices may require different pinouts, so it's crucial to verify the pinout requirements for your specific device before creating the cable.
Additionally, it is worth mentioning that there are pre-made RJ45 to RJ45 Cisco console cables available in the market, which can save you time and effort. These cables are often labeled as "Cisco console cables" and come with the correct pinouts for most Cisco devices.
In conclusion, making a RJ45 to RJ45 Cisco console cable involves terminating an Ethernet cable with RJ45 connectors and arranging the wires according to the T568B wiring standard. However, it is important to consider the pinout requirements of your specific Cisco device and verify the compatibility of the cable you create or purchase.
Wiring the RJ45 connectors for a Cisco console cable
To make a RJ45 to RJ45 Cisco console cable, you will need a few tools and materials. Here is a step-by-step guide on wiring the RJ45 connectors for the cable:
1. Gather the materials: You will need a length of CAT5 or CAT6 Ethernet cable, two RJ45 connectors, and a crimping tool.
2. Strip the cable: Use a cable stripper to remove about 1 inch of the outer jacket from each end of the Ethernet cable. Be careful not to damage the inner wires.
3. Untwist the wires: Separate the twisted pairs of wires and arrange them according to the T568B wiring standard. This standard is commonly used for Ethernet connections and is recommended by Cisco.
4. Trim the wires: Trim the wires so they are all the same length, leaving about half an inch of exposed wire.
5. Insert the wires into the RJ45 connector: Slide the wires into the RJ45 connector, making sure they are in the correct order according to the T568B standard. Double-check the order before crimping.
6. Crimp the connector: Use a crimping tool to secure the connector onto the cable. Apply enough pressure to ensure a strong connection.
7. Repeat for the other end: Repeat steps 2-6 for the other end of the cable, ensuring the wires are arranged in the same order.
8. Test the cable: Once both ends are crimped, you can test the cable by connecting it to a Cisco device and a console port. Use a terminal emulator program to establish a connection and verify that you can access the device's console.
It's worth noting that there are pre-made RJ45 to RJ45 Cisco console cables available for purchase, which may be more convenient if you don't have the tools or experience to make your own.
Pinout configuration for a Cisco RJ45 to RJ45 console cable
To make a Cisco RJ45 to RJ45 console cable, you will need the following materials: a standard RJ45 Ethernet cable, a Cisco console cable with an RJ45 connector, and a modular adapter with an RJ45 female connector on one end and a DB9 female connector on the other end.
Here is the pinout configuration for the Cisco RJ45 to RJ45 console cable:
1. Connect the RJ45 end of the standard Ethernet cable to the RJ45 female connector of the modular adapter.
2. Connect the other end of the standard Ethernet cable to the RJ45 male connector of the Cisco console cable.
3. Connect the DB9 male end of the modular adapter to the serial port of your computer.
4. Now, you have a Cisco RJ45 to RJ45 console cable ready for use.
It's important to note that the pinout configuration for Cisco console cables may vary depending on the specific model. Therefore, it is recommended to consult the documentation provided by Cisco for your specific device to ensure the correct pinout configuration.
Additionally, with the advancements in technology, some newer Cisco devices may no longer require a console cable for configuration. Instead, they can be configured using USB or Ethernet interfaces. Therefore, it is advisable to check the latest documentation and specifications for your Cisco device to determine the appropriate cable and configuration method.
Assembling and testing your homemade Cisco console cable
To make a RJ45 to RJ45 Cisco console cable, you will need the following materials: a RJ45 connector, a length of twisted pair cable (preferably CAT5e or CAT6), a soldering iron, solder, and a cable tester.
Here is a step-by-step guide to assembling and testing your homemade Cisco console cable:
1. Start by stripping the outer jacket of the twisted pair cable, exposing the individual wires inside. Trim the wires to a suitable length.
2. Untwist and straighten the wires, ensuring they are in the correct order according to the T568B wiring standard. The order should be: orange-white, orange, green-white, blue, blue-white, green, brown-white, brown.
3. Insert the wires into the RJ45 connector, making sure each wire is fully seated in its respective slot. Double-check the wiring order to avoid any connectivity issues.
4. Use a soldering iron to solder each wire to its corresponding pin on the RJ45 connector. Be careful not to apply too much heat or solder, as it can damage the connector.
5. Once all the wires are securely soldered, trim any excess wire and ensure that the connections are neat and tidy.
6. Use a cable tester to check the continuity and integrity of the connections. This will help identify any wiring mistakes or faulty connections.
7. Once the cable passes the testing, you can use it as a Cisco console cable to connect your Cisco networking devices.
It's worth noting that while making your own Cisco console cable can be cost-effective and convenient, it's important to ensure that the cable meets the necessary specifications and standards.
Troubleshooting common issues with a DIY Cisco console cable
How to Make an RJ45 to RJ45 Cisco Console Cable:
To make a DIY Cisco console cable, you will need the following materials: a standard Ethernet cable (RJ45), a DB9 female connector, and a DB9 to RJ45 adapter. Here's a step-by-step guide:
1. Start by cutting one end of the Ethernet cable and stripping the outer insulation to expose the individual wires.
2. Identify the color codes of the wires: orange, orange/white, green, blue/white, blue, green/white, brown, and brown/white.
3. Arrange the wires according to the following pinout configuration: orange/white, orange, green/white, blue, blue/white, green, brown/white, brown.
4. Insert the wires into the corresponding slots of the DB9 female connector, ensuring they are properly seated.
5. Use a crimping tool to secure the wires in place.
6. Attach the DB9 to RJ45 adapter to the other end of the Ethernet cable.
7. Your DIY Cisco console cable is now ready to use. Connect the DB9 end to the serial port of your computer and the RJ45 end to the console port of your Cisco device.
Troubleshooting Common Issues with a DIY Cisco Console Cable:
1. Check the pinout: Ensure that the wires are connected in the correct order according to the pinout configuration mentioned above. A wrong connection can lead to communication issues.
2. Test the cable: Use a cable tester or multimeter to verify continuity and check for any shorts or open circuits.
3. Verify console settings: Ensure that your computer's terminal emulator program is set to the correct baud rate (usually 9600) and other console settings match the requirements of your Cisco device.
4. Replace faulty components: If you encounter connectivity issues, try using a different DB9 to RJ45 adapter or DB9 female connector. Sometimes, faulty components can cause problems.
Remember, while making a DIY Cisco console cable can be cost-effective, it's always recommended to use genuine cables provided by Cisco or certified vendors for optimal performance and reliability.


")


