 English
 Dansk
Dansk Deutsch
 English (UK)
 Español
 Francais
 Italiano
 Magyar
 Nederlands
 Norsk
Norsk Polski
 Português (Brasil)
 Pycckui
 Suomi
Suomi Svenska
 עברית
עברית العربية
 日本语
日本语 繁體中文
繁體中文 한국어
한국어
How to stack a 9200?

To stack a 9200, you would typically use a network switch that supports stacking technology. The specific steps to stack a 9200 switch may vary depending on the manufacturer and model, but generally, you would follow these steps:
1. Ensure that all switches you want to stack are compatible with stacking technology.
2. Connect the switches using the appropriate stacking cables or modules.
3. Power on the switches and wait for them to boot up.
4. Configure the stacking settings on each switch, such as assigning a stack priority or setting a stack member number.
5. Verify the stack status to ensure that all switches are properly connected and recognized as stack members.
6. Configure any additional settings or features specific to the stacking technology being used.
7. Test the stack by verifying connectivity and functionality across the stack.
It is important to consult the manufacturer's documentation or support resources for detailed instructions on how to stack a specific 9200 switch model.
"Understanding the components of a 9200 stack"
Understanding the components of a 9200 stack is essential before attempting to stack them. The Cisco Catalyst 9200 Series switches are designed to provide high-performance networking solutions for small to medium-sized businesses.
To stack a 9200, you will need the following components:
1. Cisco Catalyst 9200 switches: These switches are the core components of the stack. They come in different models and configurations to suit your specific requirements.
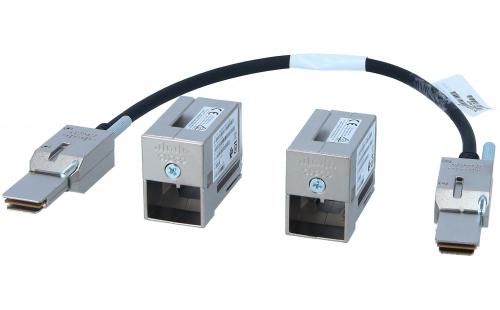
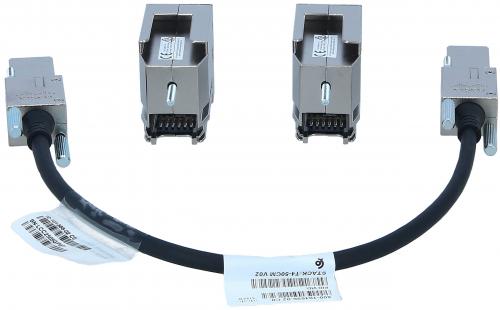
2. Stackwise cables: These cables are used to physically connect the switches in the stack. They provide both data and power connectivity between the switches, allowing them to function as a single unit.
3. Power cables: Each switch in the stack needs to be connected to a power source. Ensure that you have the necessary power cables and outlets available.
4. Network cables: You will need Ethernet cables to connect the stack to your network infrastructure. These cables should be of high quality to ensure reliable data transmission.
To stack the 9200 switches, follow these steps:
1. Power off all the switches in the stack.
2. Connect the Stackwise cables between the switches. Each switch has two Stackwise ports, so ensure that you connect them in the correct order.
3. Connect the power cables to each switch and plug them into the power outlets.
4. Connect the network cables to the appropriate ports on the switches.
5. Power on the switches. They will automatically detect and configure themselves as a stack.
6. Verify the stack configuration using the command-line interface (CLI) or the graphical user interface (GUI) provided by Cisco.
It is important to consult the Cisco documentation and the latest official resources for detailed instructions specific to your switch model and software version.

"Properly connecting and configuring a 9200 stack"
To properly connect and configure a 9200 stack, follow these steps:
1. Physical Connection: Start by connecting the stack cables between the switches. Use the provided stacking cables and ensure they are securely connected to the stacking ports on each switch. The switches should be stacked in a daisy-chain fashion, with the top switch connected to the network.
2. Power on the Switches: Power on the switches one by one, starting with the bottom switch. Allow each switch to fully boot before powering on the next one.
3. Configure Stackwise Virtual (optional): If you want to create a Stackwise Virtual link to extend the stack across multiple physical locations, you can configure it at this stage. Stackwise Virtual allows you to manage multiple switches as a single logical entity.
4. Configure Stackwise Virtual Link (optional): If you have set up Stackwise Virtual, configure the Stackwise Virtual link between the switches. This link provides high-speed connectivity between the switches and allows for seamless communication.
5. Stack Configuration: Once the switches are powered on and connected, you can configure the stack. This involves assigning a stack priority to each switch, setting the stack MAC address, and configuring any additional stack settings.
6. Verify Stack Status: Check the stack status to ensure all switches are properly connected and functioning. Use the "show switch" command to view the stack status and confirm that all switches are in the stack and have the correct stack numbers.
7. Configure Switch Settings: Finally, configure any additional switch settings such as VLANs, routing protocols, and security features as required for your network environment.
It is important to consult the Cisco documentation and the latest official resources for specific instructions and any updates regarding the configuration of a 9200 stack.
"Troubleshooting common issues in a 9200 stack"
How to stack a 9200:
To stack a Cisco Catalyst 9200 switch, follow these steps:
1. Ensure that all switches have the same software version. It is recommended to use the latest stable version to ensure compatibility and access to the latest features and bug fixes.
2. Connect the switches using the provided stacking cables. The stacking ports are located at the rear of the switches. Ensure that the cables are securely connected and that the switches are properly aligned.
3. Power on the switches. The switches will automatically detect and form a stack. You can verify the stack formation by checking the stack LED indicators on the front panel of each switch.
4. Configure the stack. Once the stack is formed, you can configure it as a single logical unit. Assign a stack member number to each switch and configure the stack priority. This can be done through the command-line interface (CLI) or the web-based graphical user interface (GUI).
5. Verify the stack configuration. Use the "show switch" command to verify the stack configuration and check the status of each stack member. Ensure that all switches are online and functioning correctly.
Troubleshooting common issues in a 9200 stack:
1. Stack formation failure: If the switches fail to form a stack, ensure that the stacking cables are securely connected and that the switches have compatible software versions. Try power cycling the switches and rechecking the connections.
2. Stack member offline: If a stack member goes offline, check the physical connections and power status of the switch. Verify that the switch has the correct stack member number and stack priority configured. If the issue persists, try removing and reinserting the switch into the stack.
3. Stack instability: If the stack becomes unstable or experiences intermittent connectivity issues, check for any software bugs or known issues related to the current software version. It is recommended to upgrade to the latest stable software version to mitigate any potential issues.
4. Stack configuration errors: If there are configuration errors in the stack, use the "show switch" and "show stack" commands to identify any misconfigurations. Double-check the stack member numbers, stack priorities, and any other configuration parameters. Make the necessary changes and save the configuration.
5. Hardware failure: In the event of a hardware failure, such as a faulty stacking cable or a malfunctioning switch, replace the faulty component with a known working one. Ensure that the replacement component is compatible with the stack and has the same software version.
Always refer to the official Cisco documentation and consult with Cisco technical support for the most up-to-date information and troubleshooting steps specific to your Cisco Catalyst 9200 switch stack.
"Optimizing performance in a 9200 stack"
To stack a 9200, you can follow these steps:
1. Connect the switches: Start by physically connecting the switches using stacking cables. The Cisco Catalyst 9200 Series switches support both copper and fiber stacking cables.
2. Power on the switches: Connect the power cables to each switch and power them on. Ensure that the power supply units are properly installed and functioning.
3. Configure stacking: Access the command-line interface (CLI) of one of the switches and enter the stacking configuration mode. Use the "stack" command to enable stacking and assign a priority to each switch.
4. Verify the stack: Once the switches are stacked, use the "show switch" command to verify the stack status. It should display information about the stack members, their roles, and their connectivity.
5. Configure stack settings: You can configure various stack settings such as stack MAC address, stack priority, and stack mode using the CLI. These settings help optimize the performance and behavior of the stack.
Optimizing performance in a 9200 stack involves several considerations. Here are a few key points to keep in mind:
1. Load balancing: The Catalyst 9200 stack supports link aggregation (EtherChannel) to distribute traffic across multiple physical links. Configure link aggregation to evenly distribute traffic and maximize throughput.
2. Stackwise Virtual: Stackwise Virtual (SVL) allows you to split the stack into multiple logical switches, providing flexibility and scalability. Utilize SVL to optimize network resources and simplify management.
3. QoS configuration: Implement Quality of Service (QoS) policies to prioritize critical traffic and ensure optimal performance for latency-sensitive applications.
4. Firmware updates: Regularly update the firmware of the stack to benefit from bug fixes, performance improvements, and new features.
5. Monitoring and troubleshooting: Utilize network monitoring tools to track the performance of the stack and identify any bottlenecks or issues. Cisco DNA Center provides centralized management and monitoring capabilities for Catalyst 9200 stacks.
By following these steps and considering the latest best practices, you can stack a 9200 and optimize its performance for your network requirements.


